How to clean your PC

A few minutes spent dusting down your computer every week could help it last longer and makes for a much more pleasant working environment
A clean computer is an efficient computer – and one that’s likely to last longer, and potentially, run more smoothly, too. Every PC, whether it be a desktop, laptop, or mini PC, picks up dust and dirt over time. Allowed to build up, this can block vents, clog fans, and cake fragile components, potentially shortening its life.
Keeping your PC clean can also help keep you healthy. In the wake of the pandemic, we’ve all become more aware of the potential for high contact surfaces, such as keyboards and mice, to become vectors for viral and bacterial transmission. Regularly cleaning these devices will not only keep them looking good, but could also help reduce the risk of infection, particularly if you’re working on a shared PC.
In some cases, the most effective cleaning routine requires the use of off-the-shelf chemicals, although these should be avoided if you or another user has experienced an adverse reaction to them in the past. Equally, when introducing new chemicals to a cleaning routine or workspace, do so with caution, and monitor for any unwelcome outcomes.
For a thorough clean you may also need to access the internal parts of your keyboard, mouse, or computer. Always take great care when doing so; use appropriate tools, and be mindful of fragile, high-voltage, or high temperature parts. Only ever access the internals of a device if it’s been designed to allow end-user access, and it’s safe to do so.
READ NEXT: The best laptops to buy
How to clean your keyboard
Along with the mouse, your keyboard is the component with which you interact most often. Over the course of a working day, it’s likely to withstand thousands of keypresses, as well as being regularly pushed around to make space for various other additions to your working space. Not only that, but your keyboard will also be at risk of coffee drips and spillages and, if you eat al-desko, is often a repository for sandwich crumbs, too. How you deal with this depends to a large degree on the kind of keyboard you have.
If it’s wired, start by disconnecting its USB cable. If you have a Bluetooth device, either remove the batteries or, if it has an integrated battery, switch it off. For wireless keyboards that can’t be unplugged or powered down, unpair them from your computer to avoid transmitting any unintended keypresses.
Those who have a mechanical keyboard with removable keys will be best-placed to give their peripheral the most thorough clean. These often ship with a key removal tool, which expands as you push it down on either side of a key and snaps into place beneath it. Removing the key is then a relatively simple move of pulling directly up on the tool until the keycap pops off. Don’t attempt this on any keyboard that you’re not certain has removable keys, since you could cause permanent damage. If yours is compatible, but you don’t have a tool, you can pick up a three-part set for £7.

Some mechanical keyboards have removable keycaps, which makes cleaning them easier.
Should you head down this route, removing all of the keys at once is the best way to achieve a thorough clean, since dust and dirt recovered from one location won’t then be lost under a neighbouring key. However, we’d recommend taking a photo of the keyboard with every keycap in place before you start, so you know how to reconstruct it once you’ve finished.
If you’re not lucky enough to have a keyboard with removable keycaps, you will need to take a less direct approach.
Start by turning your keyboard upside down and giving it a good shake, varying its direction as you go, to try to dislodge as much debris as you can. You might also use a dedicated small vacuum to suck up any visible dust and crumbs that you can’t remove in this way.
Keyboard vacuums are relatively inexpensive, with Amazon’s “choice” device – the 42W SUMEI rechargeable keyboard vacuum cleaner – coming in at just under £20. Such vacuums could also be used to clean other hard-to-reach places, such as the air vents in your car.
To clean the keycaps themselves, rather than the spaces beneath them, HP recommends using a cotton swab dipped in isopropyl alcohol to gently wipe over the surfaces. Stop immediately if you notice any discoloration to either the key or the character printed on it, and be very careful not to drip any liquid into the keyboard itself – particularly if you’re working on a laptop, where the keyboard sits on top of other sensitive components.
Isopropyl alcohol is easy to source, but should be kept out of the reach of children. You can pick up a 500ml spray bottle for £10. Spray onto a cloth then wipe over the item to be cleaned, rather than directing the spray immediately onto the device itself.
Finally, should the characters on your keys be fading, you can replace them fairly easily. Keycap sticker packs are available in a variety of designs, and for different languages. You can pick up a UK layout set, with two sheets of stickers, for £6. Most sets aren’t transparent, since this would allow any remnants of the previous key design to show through, so they may interfere with keyboard backlighting. Bear this in mind if you rely on keyboard illumination for typing in the dark.
READ NEXT: Best keyboard
How to clean your mouse
Mice can quickly become dirty. Fortunately, cleaning them is less of a chore today than it was when mice had trackballs, which worked by rotating a pair of offset wheels as you pushed them around. The trackballs and wheels have long gone – and so is the dust and hair that used to become tangled around them.
First, remove the batteries or switch off your mouse if it’s a wireless device. If it’s connected by a cable, unplug it.
Start by making sure the eye on the underside of the mouse is unobstructed. We’ve found a wooden cocktail stick to be an effective tool for picking out dust that may have become lodged at the edge of the aperture; but be careful not to press it further into the body, or to use it on the lens itself. You can also use a cocktail stick to remove dirt and dust from the scroll wheel aperture. When doing so, be very careful not to bend the stick – you don’t want to risk snapping off the end inside the mouse. This could damage your mouse beyond repair.
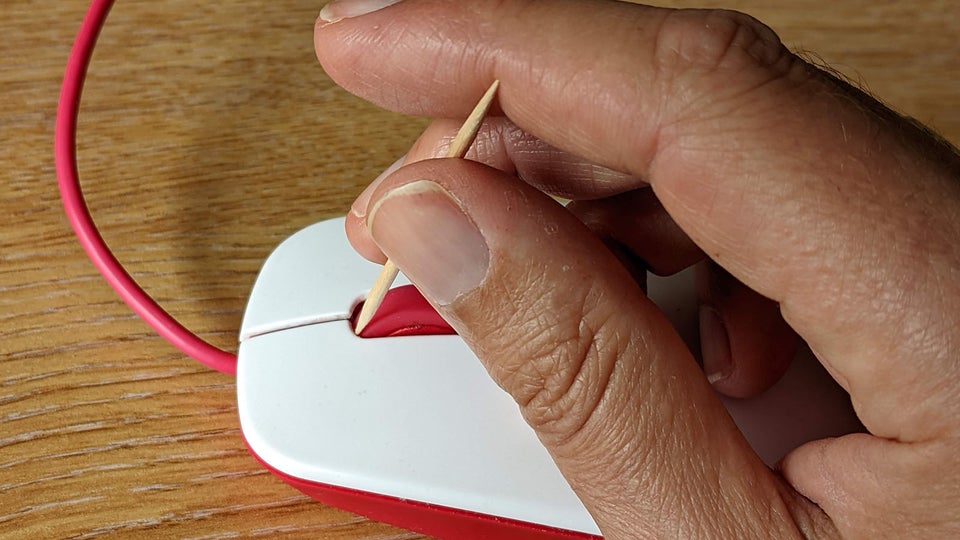
Careful use of a cocktail stick can help when cleaning dirt from a mouse.
Use a damp paper towel or microfibre cloth – ensure you wring it out of any excess moisture before doing so – to remove dirt from the surface of the mouse. As with the keyboard, be super-careful not to get any liquid into the mouse itself.
For stubborn dirt, you may again need to resort to isopropyl alcohol. Spray this onto your cleaning cloth and then use it to wipe down the mouse.
READ NEXT: The best monitors to buy
How to clean your screen
Most screens are unlikely to require anything more than a light dusting as part of a regular cleaning routine.
However, fingerprints, splashes from your breakfast bowl if you eat in front of it, and greasy marks from the keyboard on laptop displays, will require more attention. Such marks are ugly, distracting, and for anyone for whom pixel perfection is key – such as a photo or video editor – they can be a real hindrance to getting your best work done.
Turn off and disconnect your screen before cleaning it. Start by dusting the surface of the display using a lint-free cloth. This should be sufficient to remove any excess dust, and make a judgement over whether it requires further attention. If the screen looks clean at this point, continue using it as before: there’s no point using cleaning products on its surface if it isn’t required.
However, in those instances the screen requires a more thorough clean, use a dedicated screen-cleaning product to avoid leaving behind any smears or damaging its surface.
We’ve had good experiences with the Whoosh Screen Shine kit (£9), which comprises a small microfibre cloth and a bottle of cleaning solution. Spray the solution onto the cloth, then use it to wipe over the surface of the display. We’ve found it super-effective for removing fingerprints from touch-sensitive displays such as those on tablets and phones.

Dedicated screen cleaning products can help remove dirt and finger marks.
For those who prefer to use a disposable product, Fellowes screen wipes (200 for £6) are biodegradable and shipped in a container that should help keep them moist after opening.
If you’re using a liquid formula to clean a display, avoid spraying it onto the screen – and make sure you use an appropriate cloth. Display manufacturer Acer warns users to, “avoid using paper towels or facial tissues [as they] can sometimes be harsh and can also leave fibre residue on the surface of your computer screen”.
READ NEXT: The best wireless mice to buy
How to clean your computer
The computer itself is the most complex part of your setup. It’s home to a number of fragile, expensive components that can be easily damaged – and some parts (including, but not limited to, the power supply) can carry high voltages. As a result, care should be taken when cleaning your computer, particularly if you access the insides. And always ensure it’s switched off before you start.
First, tackle the outside of the case. You can use damp wipes or microfibre cloths treated with cleaning solution or isopropyl alcohol, but be very careful not to get any moisture inside the machine. As mentioned, always apply solutions to the cloth rather than directly to the computer, and stop immediately if you notice any adverse reactions between the solution and the surface being cleaned. Be particularly careful not to get any cleaning solution into ports, power sockets, vents, or fans – or, if cleaning a laptop, between the keys.
You may notice a build-up of dust in the computer’s vents. Ideally, these should be kept clear to maintain efficient airflow across internal components, which can help reduce the risk of your machine overheating. A small vacuum, such as the 42W SUMEI rechargeable keyboard vacuum cleaner highlighted in the keyboard section may help. However, a vacuum should always be used with care for cleaning vents and fans, since you want to avoid drawing more dust through the insides of the case while doing so.
If possible – and if it’s safe – remove the case before tackling vents and fans. Be particularly wary of doing so with a laptop, mini PC, or all-in-one, though, which may have been constructed with very fine tolerances, and may therefore be difficult to reconstruct. Don’t attempt to remove Torx or other specialist screws without the appropriate tools, and observe the usual precautions against static and the risk of shock. Only touch a component if absolutely necessary; stand on a hard, rather than carpeted area, when working, and consider using an anti-static service kit to reduce the risk of damage. You may need a set of specialist drivers, including Torx drivers, to open up your computer case.
Resist the temptation to blow away any loose dust using your mouth. Instead, use canned, compressed air. There are several brands to choose from, but whichever you opt for, pick one with a long nozzle so you can accurately direct it. The 5 Star Spray Can Duster has an average score of 4.3 on more than 18,000 Amazon reviews, and is available as a single purchase (£4) or in multi-packs.
Compressed air dusters can sometimes condense when used for extended periods, so apply short blasts if possible, and avoid getting too close to any component. In addition, be careful not to allow moisture buildup to drip from the end of the nozzle and into your PC.
Should you feel it necessary to remove components for a more thorough clean, or to access otherwise obstructed areas, be very careful to fully re-seat them before switching your machine back on again. If you remove heatsinks from components that run hot – CPUs, GPUs, and memory, for example – check whether you need to renew any of the thermal paste that sits between the component and heatsink to conduct heat.
If you do, fully remove any old paste using a product such as ArctiClean before applying fresh paste. Be careful not to apply too much – you don’t want the paste to ooze out from beneath the heatsink. Processor manufacturer Intel’s advice is to “use the correct amount of thermal paste, which is roughly the size of a pea or a grain of rice. An insufficient amount might not cover the surface area needed in order to be effective. Too much reduces the efficacy of the paste, due to the metal surfaces being too far apart, and also risks spilling out onto the motherboard during installation”.
READ NEXT: Best laptop bag
Establishing a routine
Once you’ve thoroughly cleaned your computer, it’s worth making an effort to keep it that way. A clean screen, keyboard, and mouse not only look better – they can also contribute to a healthier working environment, since they’re less likely to be a breeding ground for bacteria.
And a PC case that’s free of dust, with vents that aren’t clogged and fans that can turn freely, will be better at keeping internal components cool, potentially extending their service life.


